How To Set Up a Personalised Shortcuts List on a SharePoint Site
What is this? A tutorial on how to set up a cool list on SharePoint where staff can manage their favourite links, ideally on the homepage of your intranet.
This keeps all their commonly accessed web-stuff 1 click away, and it means you do not have to fill up your SharePoint navigation with 100's of useless links that only 5-10 people use.
Woah that sounds sweet, how is that even possible!? Well I'm going to show you how, in this tutorial we are using SharePoint Online, because then this post will be relevant for more than a year.
Step 1: Create a Custom List called 'Personal Shortcuts' by clicking Settings > Add an app, and selecting 'Custom List'.

Step 2: Create a new column in your new list by clicking the List Tab > Create Column. Call the new column 'Shortcut', Set the Type as 'Hyperlink or Picture' & make sure the column requires a value.

Step 3: Now we need to remove the Title column from this list.
- Navigate to List Tab > List Settings

- Set Advanced Settings > Allow management of content types: Yes
- In List Settings, you should now see a Content Types section. Click on the 'Item' link

- Click on the Title Column, set to Hidden (Will not appear in forms)
Step 4: Create a Personalised View of the list
- Go back to your list & click List Tab > Create View > Standard View & set it up as follows
- View Name: My Shortcuts
- Only display the 'Shortcut' Column
- Sort by: Shortcut
- Filter: Where 'Created By' is equal to [Me]
- Click OK
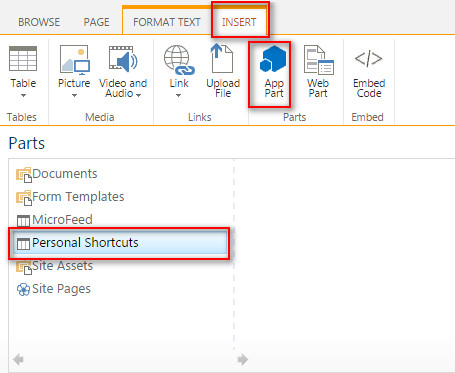
Step 5: Edit page & add an App Part
- Click Settings Cog > Edit Page

- Click inside one of the squares on the page and click Insert Tab > App Part > Personal Shortcuts and then Add
Step 6: Remove App Part toolbar & header
- In the top right hand corner of the App Part, there is a little down-arrow. Click it, then click Edit Web Part

- Choose the following settings then Apply & OK
- Selected View: My Shortcuts
- Toolbar Type: Summary Toolbar
- Appearance > Chrome Type: None
- Save Page.

Step 7: Using the list. You should now have a cool Personalised Shortcuts Web Part on your homepage where people can create their own shortcuts and no one else can see them!! Don't forget to make sure Everyone has Contribute permissions on the list.
This was initially developed to help with people trying to manage their global navigation, if you haven't read it yet, take a look at my previous post: What Should be Allowed to go in Global Navigation
How did you go? All good? Got some additional tips?

Comments
Post a Comment